Why Site Plans Matter When Buying a New Build
When you first visit a new build show home, the sales advisor will almost certainly present you with a site plan — a detailed map of the entire development showing every plot, road, green space, and community facility. For many buyers, this document can seem overwhelming at first glance, filled with symbols, numbers, and coloured zones that require some decoding. However, understanding how to read a site plan is one of the most valuable skills you can develop as a new build purchaser.
A site plan is far more than just a map. It is your window into how the finished development will look and function, which plots offer the best value, and how your daily life will be shaped by the layout of roads, parking, and communal spaces around your home. Getting this right at the outset can mean the difference between a home that perfectly suits your needs and one where you discover frustrations only after moving in.
This comprehensive guide explains everything you need to know about reading new build site plans, understanding development phases, interpreting CGIs (computer-generated images), and using planning documents to make an informed purchase. Whether you are a first-time buyer or an experienced homeowner, the information here will help you navigate the process with confidence.
How to Read a New Build Site Plan
A new build site plan is a bird’s-eye view of the entire development, drawn to scale and typically oriented with north at the top. The plan will show every individual plot (numbered), the road network, footpaths, parking areas, landscaping, and any communal facilities such as play areas or open green spaces. Understanding the key elements will help you choose the right plot for your needs.
Key Elements of a Site Plan
Every site plan uses a combination of symbols, colours, and annotations to convey information. While there is no single universal standard across all developers, most follow similar conventions. Here are the elements you should look for:
- Plot numbers: Each home is assigned a unique plot number, usually printed within or beside the outline of the building footprint. These numbers correspond to the price list and specification details.
- House type labels: Alongside or beneath plot numbers, you will often see a house type name or code (e.g., “The Windsor” or “Type A”). This tells you which floor plan and elevation design applies to that plot.
- Boundary lines: Dashed or solid lines around each plot indicate the legal boundary of the property. Red lines typically show the plot boundary, while blue lines may indicate shared ownership areas.
- Parking allocations: Spaces are marked with a “P” or numbered to match the plot. Look for garages (shown as smaller rectangles attached to or near the house), driveways, and visitor parking bays.
- North arrow: Always check the compass direction. This tells you which way your garden faces — a south-facing garden gets the most sunlight, while a north-facing garden may be in shadow for much of the day.
- Scale bar: The scale allows you to measure approximate distances between features, such as the distance from your front door to the nearest road or play area.
- Landscaping and green spaces: Trees are shown as circles or stylised shapes, hedgerows as lines of small circles, and open green spaces as shaded areas. These features significantly affect the feel of the development.
- Drainage and utilities: Some plans show the routes of sewers, drainage attenuation features (such as ponds or swales), and utility connections. These are more common on detailed planning application drawings.
Common Site Plan Symbols Explained
| Symbol | Meaning | What to Check |
|---|---|---|
| Solid red line | Plot boundary | Confirms the extent of land you own |
| Dashed blue line | Shared boundary or developer-retained land | Maintenance responsibilities may apply |
| Green circles | Existing or proposed trees | Check if trees are protected (TPO) — they cannot be removed |
| “P” in rectangle | Allocated parking space | Number of spaces per plot and visitor parking nearby |
| Arrow with “N” | North direction | Determines garden orientation and sunlight |
| Wavy blue lines | Water features, attenuation ponds, or swales | Flood risk and proximity to your plot |
| Hatched areas | Public open space or unadopted land | Who maintains these areas and at what cost |
| Thick dark outline | Building footprint | The actual shape and size of the home |
| Double lines with hatching | Fencing (close-boarded or acoustic) | Privacy levels and noise mitigation |
| Dotted lines through plots | Easements or rights of way | Restrictions on what you can build or plant |
Understanding Plot Orientation
The orientation of your plot — particularly your rear garden — is one of the most important factors that the site plan reveals. Using the north arrow on the plan, you can determine which direction your garden faces and how much natural sunlight it will receive throughout the day.
- South-facing garden: Receives sunlight for most of the day, from late morning through to evening. This is the most sought-after orientation and often commands a premium. Ideal for families who enjoy outdoor living, gardening, or entertaining.
- West-facing garden: Catches the afternoon and evening sun, making it perfect for enjoying summer evenings outdoors. A popular choice for those who work during the day.
- East-facing garden: Enjoys morning sun but falls into shadow during the afternoon. Good for early risers and breakfast in the garden, but less ideal for evening use.
- North-facing garden: Receives the least direct sunlight and may be in shadow for much of the day, particularly in winter. However, this orientation means the rear rooms of the house face south, which can make living spaces brighter.
Beyond garden orientation, consider the position of neighbouring buildings. A plot next to a taller apartment block may be overshadowed regardless of its compass orientation. Similarly, plots on the edge of a development often benefit from open views and reduced overlooking, but may be closer to main roads or agricultural land.
Understanding Development Phases
Large new build developments in the UK are almost always built and sold in phases. A development of 500 homes might be divided into five or more phases, each containing 50 to 150 plots that are built and released over a period of months or years. Understanding how phasing works — and which phase to buy in — can have a significant impact on your buying experience, the price you pay, and the disruption you experience after moving in.
How Phasing Works
Developers phase their projects for practical and financial reasons. Building an entire development at once would require enormous upfront capital, create logistical challenges with materials and labour, and flood the local market with too many homes at once. Instead, developers build in stages, using the revenue from early phases to fund the construction of later ones.
Each phase typically has its own planning permission (or is covered under an outline planning permission with reserved matters for each phase), its own construction programme, and its own sales release. The buying process is the same regardless of which phase you buy in, but the experience of living on a partially completed development varies considerably.
Early Phase vs Late Phase: A Comprehensive Comparison
| Factor | Early Phase (Phase 1–2) | Late Phase (Phase 4+) |
|---|---|---|
| Price | Lower launch prices, often £5,000–£15,000 below later phase equivalents; developers offer incentives to establish sales momentum | Higher prices, often £10,000–£30,000 more than Phase 1 equivalents, reflecting market growth and completed amenities |
| Plot choice | Widest selection of plots, house types, and positions | Limited remaining plots; best positions may be taken |
| Construction disruption | Ongoing building work around your home for months or years after moving in | Minimal or no remaining construction activity |
| Landscaping maturity | Newly planted; gardens and communal spaces look bare initially | Established trees, hedgerows, and landscaping create a more finished feel |
| Community facilities | Play areas, shops, and community spaces may not yet be built | All amenities completed and operational |
| Road completion | Some roads may be temporary; final surfacing done later | All roads fully adopted with permanent surfaces |
| Snagging patterns | Developer still refining build processes; some teething issues | Build quality often improves as the construction team refines their approach |
| Capital growth | Greater potential for price appreciation as the development matures | Less room for growth; prices already reflect the finished development |
| Negotiation leverage | Good leverage on launch incentives but prices are already competitive | More scope to negotiate on remaining plots that the developer is keen to sell |
| Mortgage valuation | May be valued conservatively due to lack of comparable sales nearby | Stronger comparables from earlier phase sales support valuations |
Tips for Choosing the Right Phase
- Budget-conscious buyers: Early phases typically offer the best value. Developers set introductory prices to generate momentum and secure initial sales. Combined with launch incentives such as part-exchange deals or contribution to stamp duty, early-phase buyers can secure significant savings.
- Families with young children: Later phases may be preferable if you want to avoid living next to active building sites. Construction traffic, noise, and dust can be disruptive, particularly for families with babies or toddlers.
- Investors: Early phases offer the greatest capital appreciation potential. Homes purchased at Phase 1 prices have historically increased in value by the time the development is completed, often by 10–20% or more on large schemes.
- Retirees and downsizers: A later phase provides a quieter, more settled environment with mature landscaping and all facilities in place.
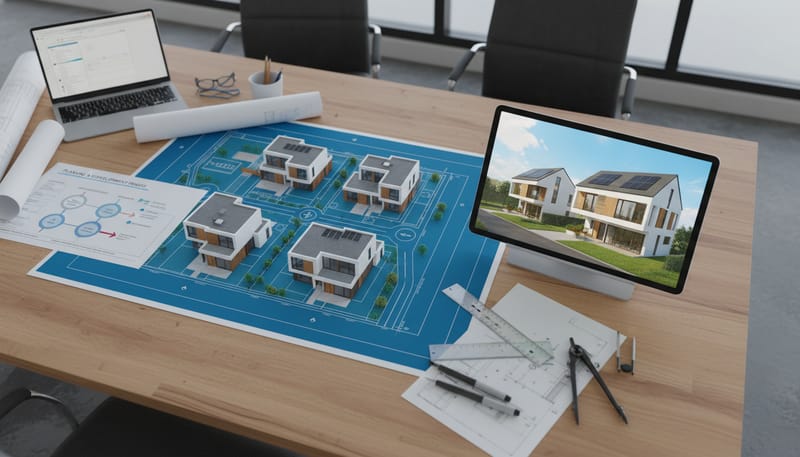
Interpreting CGIs: What Computer-Generated Images Show vs Reality
Computer-generated images (CGIs) are the glossy, photorealistic pictures that developers use to market their developments before — and during — construction. These images show what the finished homes and streetscenes are expected to look like, and they play a central role in the sales process. However, it is important to understand what CGIs represent and where reality may differ.
What CGIs Typically Show
A high-quality CGI will depict the external appearance of the home, including the materials (brick type, roof tiles, window frames), the landscaping around the property, and the surrounding streetscene. Interior CGIs may show kitchens, bathrooms, and living spaces furnished and decorated to an aspirational standard. Aerial CGIs show the development as a whole, giving buyers a sense of the layout, green spaces, and relationship between different parts of the scheme.
Where CGIs May Differ from Reality
- Landscaping scale: Trees in CGIs are often shown at their mature height, which may take 10–15 years to achieve. Newly planted trees and hedgerows will look significantly smaller when you first move in.
- Weather and lighting: CGIs almost always depict sunny, summer conditions with warm lighting. Your home will look different on a grey winter day.
- Surrounding context: CGIs may not accurately show neighbouring buildings, power lines, commercial properties, or other features that exist beyond the development boundary. Always visit the site in person.
- Material colours: Brick and tile colours in CGIs may not precisely match the final materials used. Mortar colour, weathering, and batch variations can affect the appearance.
- Internal specifications: Show home interiors and interior CGIs often include expensive furniture, bespoke curtains, and designer accessories that are not included in the purchase price. Focus on the standard specifications listed in the sales brochure.
- Scale and proportions: Wide-angle rendering can make rooms appear larger than they are. Always check the floor plans with measurements rather than relying solely on CGI impressions of room size.
How to Use CGIs Effectively
Despite these caveats, CGIs are a useful tool when used correctly. They give you a clear idea of the architectural style, the general layout of the development, and the developer’s design intentions. The key is to use them alongside other information sources rather than in isolation.
When reviewing CGIs, ask your sales advisor the following questions:
- Which materials shown in the CGI have already been confirmed and approved under planning permission?
- Are the boundary treatments (fences, walls, hedges) shown in the CGI included in the plot specification?
- How do the room sizes in the CGI compare to the actual floor plan dimensions?
- Is the landscaping shown indicative or confirmed?
- What is the expected timeline for communal landscaping and play areas to be completed?
Using Planning Documents to Your Advantage
Beyond the sales brochure and CGIs, every new build development has a wealth of publicly available planning documents that can provide invaluable information for buyers. These documents are held by the local planning authority and can be accessed online through the council’s planning portal.
Key Planning Documents to Review
| Document | What It Tells You | Why It Matters |
|---|---|---|
| Approved site layout plan | The legally binding version of the site plan showing all plots, roads, and spaces | Confirms exactly what is being built and any conditions attached |
| Design and Access Statement | The developer’s design rationale, materials palette, and approach to landscaping | Shows the design vision and any promises made about quality or character |
| Section 106 Agreement | Legal obligations the developer must fulfil, such as affordable housing provision, school contributions, and highway improvements | Confirms what community benefits will be delivered and when |
| Flood Risk Assessment | Detailed analysis of flood risk on the site, including mitigation measures | Essential for understanding drainage infrastructure and residual flood risk |
| Transport Assessment | Traffic impact analysis, proposed road layouts, and access arrangements | Reveals expected traffic volumes and any highway improvements planned |
| Ecology Report | Wildlife surveys and biodiversity mitigation plans | Indicates protected habitats nearby and green infrastructure commitments |
| Noise Assessment | Noise levels from nearby roads, railways, or industrial uses | Identifies plots that may require acoustic glazing or fencing |
| Phasing Plan | The planned order and timeline of construction phases | Helps you understand when different parts of the development will be built |
Accessing these documents is straightforward. Visit your local council’s website and search the planning applications register using the development name or address. All documents submitted as part of a planning application are public records. Your conveyancing solicitor will also review relevant planning conditions as part of the legal process.
Planning Conditions to Watch For
Planning permissions often come with conditions that affect the finished development. These might include requirements for specific materials, restrictions on working hours during construction, obligations to complete landscaping within a certain period, or conditions requiring the developer to build community facilities before a certain number of homes are occupied. Understanding these conditions gives you a clearer picture of what the development will eventually look like and when key features will be delivered.
Practical Tips for Site Visits
While site plans, CGIs, and planning documents provide essential information, nothing replaces visiting the development in person. A well-planned site visit allows you to verify the information you have gathered and assess factors that are difficult to capture on paper.
What to Check During Your Visit
- Orientation check: Use a compass app on your phone to verify the garden orientation shown on the site plan. Stand on or near your intended plot and check which direction gets the most light.
- Noise levels: Visit at different times of day if possible. Morning rush hour, school run times, and evening periods can reveal traffic or noise issues that are not apparent at weekends when most viewings take place.
- Walking distances: Walk from your plot to key amenities — the bus stop, nearest shop, school, and park. Site plans can make distances look shorter than they feel on foot.
- Ground conditions: After rain, check for waterlogging or poor drainage around your plot. While the developer will install drainage systems, the natural topography of the land matters.
- Neighbouring land use: Look beyond the development boundary. Is there farmland (potential future development), industrial units, or a busy road nearby? Check the local plan for any allocated development sites adjacent to the scheme.
- Construction progress: If the development is under construction, observe the quality of work on completed plots. Well-organised sites with tidy plots and careful brickwork are generally a good sign.
Questions to Ask the Sales Team About the Site Plan
- Which plots are still available, and why were they not sold earlier?
- What is the planned timeline for completing each remaining phase?
- Are there any changes to the site plan since planning permission was granted?
- What boundary treatments (fences, walls) are included with each plot?
- Who will maintain the communal green spaces, and what are the expected annual charges?
- Are there any easements, rights of way, or restrictive covenants affecting available plots?
- What is the parking allocation for my plot, and where is the nearest visitor parking?
Key Factors When Evaluating a Site Plan
When reviewing a site plan, several factors deserve particular attention. The chart below highlights the key considerations that experienced buyers prioritise when choosing a plot on a new build development.
Based on buyer survey data from major UK developments 2023–2025. Percentage indicates proportion of buyers rating each factor as “important” or “very important.”
As the data shows, garden orientation consistently ranks as the most important factor for UK buyers, followed closely by parking provision and privacy. These are all elements that can be assessed directly from the site plan before you even visit the development. Taking time to study the plan carefully and cross-reference it with the compass orientation and neighbouring features will help you identify the plots that offer the best combination of these factors.
Frequently Asked Questions
Can the site plan change after I have reserved a plot?
Yes, site plans can be amended, though significant changes require a new planning application or a “non-material amendment” from the local authority. Minor changes to landscaping, boundary treatments, or internal layouts are relatively common. Your reservation agreement and purchase contract should specify the site plan version that applies to your plot. Always ask whether any amendments are pending, and have your solicitor review any changes before exchange of contracts.
How accurate are the room sizes shown in floor plans?
Floor plans provided by developers should be accurate to within reasonable tolerances (typically ±50mm). However, note that floor plan dimensions usually measure to the internal face of the plasterboard, not including skirting boards or any built-in features. Ceiling heights are typically 2.4 metres in new builds. Always ask for dimensions in metres and square metres, and compare them against the Nationally Described Space Standard to understand how the home compares to recommended minimums.
What does “indicative only” mean on a CGI?
The phrase “indicative only” is a legal disclaimer that developers include to protect themselves against minor variations between the CGI and the finished product. It means the CGI represents the developer’s intention but is not a contractual guarantee of the final appearance. Materials, colours, landscaping, and some design details may change. This is why it is essential to review the written specifications and approved planning drawings alongside the CGIs.
Should I buy in Phase 1 or wait for a later phase?
This depends on your priorities. Phase 1 typically offers the best prices and widest plot choice, with potential for capital appreciation as the development matures. However, you will live with construction activity around you for potentially several years. Later phases offer a quieter, more established environment but at higher prices and with fewer plots to choose from. Budget-focused buyers and investors generally favour early phases, while those prioritising a finished, settled community may prefer later phases.
How can I check if there are future developments planned near my plot?
Check your local council’s Local Plan, which allocates land for future development over a 15–20 year period. You can also search the council’s planning applications register for any applications on neighbouring land. Your conveyancing solicitor will conduct local authority searches that reveal planned road schemes, compulsory purchase orders, and other matters that could affect your property. For additional peace of mind, review the location checklist to ensure you have covered all the key considerations.
Making Confident Decisions with Site Plans and CGIs
Understanding new build site plans, development phases, and CGIs is essential for making a well-informed purchase. By learning to read the symbols and markings on a site plan, you can identify the plots that offer the best orientation, privacy, and parking. By understanding how phasing works, you can decide whether to buy early for value or later for a more settled environment. And by treating CGIs as helpful illustrations rather than contractual guarantees, you avoid potential disappointments.
Take the time to review the publicly available planning documents for any development you are considering. These documents reveal details about the developer’s obligations, the timeline for community facilities, and any conditions that could affect your home. Combine this desk research with thorough site visits at different times of day, and you will be in a strong position to choose the right plot on the right development.
For more guidance on the buying process, explore our complete guide to buying a new build home, learn about customising your home before completion, or review our buyer’s paperwork checklist to ensure you have everything in order. You can also browse new build developments near you to start your search today.