Why a Snagging App Beats Pen and Paper
Gone are the days when snagging your new build meant walking around with a notepad, scribbling defects and trying to remember which room had the dodgy sealant. Modern snagging apps let you photograph, annotate, categorise, and track every defect from your smartphone — creating a professional record that developers take seriously.
The advantages of using a dedicated snagging app are significant. Your phone’s camera captures high-resolution evidence, GPS tagging pins each defect to its exact location, and the app organises everything into a shareable report. When you submit a well-structured digital snagging list to your developer, it’s far harder for them to ignore or dispute compared to a handwritten list.
Whether you’re conducting your own inspection or complementing a professional snagging survey, having the right app on your phone ensures nothing falls through the cracks. This guide covers the best options available in the UK, what features to prioritise, and how to get the most out of your chosen app.
Essential Features to Look For in a Snagging App
Not all snagging apps are created equal. Some are simple photo-and-note tools, while others offer comprehensive project management features. When choosing an app to document defects in your new build snagging inspection, look for these key capabilities:
Additional features worth considering include the ability to categorise defects by trade (plumbing, electrical, carpentry, etc.), priority levels (cosmetic, functional, urgent), and sharing capabilities that let you grant your developer read-only access to your snag list so they can update the status of each item as they work through repairs.
Popular UK Snagging Apps Compared
Several snagging apps have established themselves in the UK market, each with different strengths. Here’s how the most popular options compare for homeowner use:
The Snag List App is purpose-built for UK homeowners and offers the most comprehensive feature set for residential snagging. It supports room-by-room organisation, in-app photo annotation, and generates professional PDF reports branded with your property details. Available on both iOS and Android.
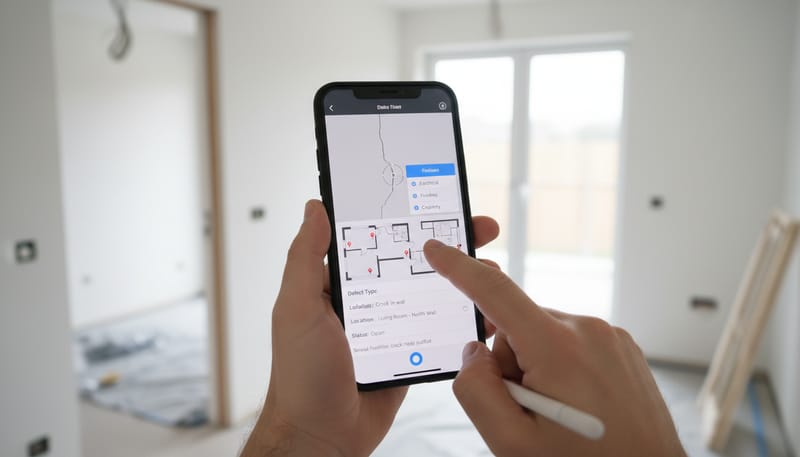
Punch List and iSnag are more geared toward construction professionals but work well for homeowners who want granular tracking. They offer floor plan pinning, which lets you drop defect markers onto a plan of your property for precise location mapping.
HomeSnagging is a simpler option that focuses on ease of use, making it a good choice if you want something straightforward without a steep learning curve. It includes pre-built checklists based on common new build defect categories.
Photo and Video Documentation Best Practices
The quality of your photographic evidence can make or break a snagging claim. Developers are far more responsive to clear, well-documented defects than vague descriptions. Here’s how to capture evidence that leaves no room for dispute.
For each defect, take at least two photos: a wide shot showing the location within the room and a close-up showing the detail of the defect. For cracks, use raking light (holding your phone torch at a low angle) to make hairline fractures visible. For video, a short clip showing squeaky floors or dripping taps provides evidence that photos alone cannot.
Most snagging apps embed EXIF data (date, time, GPS coordinates) in photos automatically. This creates a tamper-proof evidence trail that proves when and where each photo was taken — invaluable if your snagging claim is ever disputed.
Tracking Fix Status and Following Up
Documenting defects is only half the battle. The real value of a snagging app is its ability to track the status of each defect through the rectification process. Once you’ve submitted your snag list to the developer, you need to monitor which items have been acknowledged, scheduled, completed, and verified.
Set calendar reminders to review your snag list at regular intervals — weekly during the first month after handover, then monthly during the first year. Many apps let you filter by status, so you can quickly see which items remain open and chase the developer accordingly.
Generating Professional Snagging Reports
One of the most powerful features of a snagging app is the ability to generate a professional PDF report at the tap of a button. A well-formatted report carries significantly more weight with developers than a casual email listing defects.
When generating your report, organise defects by room and then by priority (urgent, standard, cosmetic). Include a cover page with the property address, your name, the inspection date, and the developer’s contact details. Most apps will include this automatically, but check the output before sending.
Email the completed PDF report to the developer’s customer care team and keep a copy for your records. The report creates a formal paper trail that is essential if you later need to escalate to the NHBC or another warranty provider. Include a covering email requesting written acknowledgement of receipt and a proposed timeline for rectification.
Free vs Paid Snagging Apps: What’s Worth Paying For
Most snagging apps offer both free and paid tiers. For a typical homeowner conducting a one-time snagging inspection, the free version of many apps will be sufficient. However, if you want ongoing tracking capabilities or professional-grade reports, a paid subscription may be worthwhile.
Given that the average new build has around 47 snags, many homeowners will hit the free tier’s defect limit. If you anticipate a longer snagging process with multiple rounds of inspection, investing £5–£15 in a premium subscription is money well spent. Consider it a fraction of the cost of a professional snagging inspection (typically £300–£600), and it gives you the tools to track defects throughout the entire two-year builder liability period.
Tips to Maximise Your Snagging App
Regardless of which app you choose, following these best practices will help you get the most out of your digital snagging process and ensure your developer takes your defect list seriously.
Finally, remember that a snagging app is a tool to support your inspection, not a substitute for knowledge. Understanding what constitutes a genuine defect versus normal settlement or cosmetic variation is essential. Read our complete snagging guide before your inspection, and consider whether a professional snagging surveyor might be worth the investment alongside your own app-based documentation. The combination of professional expertise and your own ongoing digital tracking gives you the strongest possible position when dealing with your developer.