Why New Builds Favour Open-Plan Layouts
The dominance of open-plan design in UK new builds is not a passing fashion. It reflects a convergence of modern building regulations, buyer expectations, and construction efficiency that makes separated ground-floor rooms increasingly uncommon in homes built from 2020 onwards.
- Building Regulations Part L: Modern insulation standards and airtightness requirements mean new builds retain heat exceptionally well. A single open volume circulates warm air efficiently, reducing the need for radiators in every partitioned room and making open-plan layouts thermally practical.
- MVHR Compatibility: Mechanical Ventilation with Heat Recovery systems, now standard in many new builds, work optimally in open volumes where air flows freely between extract and supply points.
- Natural Light Penetration: Removing internal walls allows daylight from rear bi-fold doors and side windows to reach deep into the ground floor, reducing reliance on artificial lighting during the day.
- Buyer Demand: NHBC survey data consistently shows open-plan kitchen-dining-living areas as the most desired feature among UK new build buyers, ahead of en-suites and garden size.
- Construction Efficiency: Fewer internal walls, doors, lintels, and separate electrical circuits reduce build complexity, allowing developers to invest in higher-quality finishes and specifications elsewhere.
- Flexible Living: A single adaptable space accommodates remote working, home schooling, entertaining, and family time without permanent structural commitment to any one use.
The result is a ground floor that feels twice its actual size, floods with light, and adapts to how modern British families actually live. The challenge is not whether open-plan works, but how to zone and style it so each area within the space feels purposeful. For related kitchen-specific guidance, see our new build kitchen design guide.
Open-Plan vs Broken-Plan: Pros and Cons
Before committing to a fully open layout, it is worth understanding the alternative that has gained traction since 2023: broken-plan living. This approach uses partial walls, glazed screens, sliding doors, or half-height partitions to create zones with some visual and acoustic separation while preserving the sense of openness. Here is how the two compare.
| Factor | Fully Open-Plan | Broken-Plan |
|---|---|---|
| Natural light | Maximum penetration; no barriers to daylight | Good, though partial walls can create shadow zones |
| Sense of space | Feels extremely generous and airy | Feels spacious but with defined character areas |
| Noise control | Poor; sound travels freely between zones | Moderate; partial barriers absorb and deflect sound |
| Cooking smells | Permeate entire space without strong extraction | Partially contained; glazed screens help significantly |
| Privacy | Minimal; every activity is visible and audible | Improved; sliding doors allow temporary separation |
| Heating efficiency | Excellent in well-insulated new builds | Good; separate zones can be temperature-controlled |
| Flexibility | Highly adaptable; furniture reconfiguration is easy | Moderate; partial structures are semi-permanent |
| Retrofit cost | None if already open-plan | £1,500–£6,000 for glazed screens or sliding partitions |
| Resale appeal | Strong; most buyers expect open-plan ground floors | Growing; appeals to families wanting noise control |
| Best suited to | Couples, young families, entertainers | Larger families, home workers, noise-sensitive households |
Most new builds are delivered fully open-plan. If you prefer broken-plan, the zoning techniques in this guide still apply, but you may also want to explore Crittall-style glazed screens (from £800 per panel installed) or pocket sliding doors (from £1,200 fitted) as retrofit additions. Both preserve sightlines and light while providing the option to close off zones when needed.
Zoning Techniques: A Detailed Comparison
Effective zoning transforms a single large room into a space that feels like three distinct areas connected by a shared design language. The best open-plan schemes combine at least three or four of the following techniques simultaneously. Here is how each method performs across key criteria.
| Zoning Technique | Visual Impact | Acoustic Benefit | Typical Cost | Reversibility | Best For |
|---|---|---|---|---|---|
| Flooring transitions | High | Low–moderate | £200–£1,500 | Low (permanent) | Kitchen-to-living boundary |
| Rugs | Moderate–high | Moderate | £100–£600 each | High (fully portable) | Dining and living zones |
| Lighting circuits | Very high (at night) | None | £200–£500 | Low (wired in) | Atmosphere and mood control |
| Furniture placement | High | Low–moderate | £0 (repositioning) | High | Sofa-as-divider, shelving walls |
| Paint colour shifts | Moderate | None | £50–£200 | Medium (repaintable) | Subtle zone differentiation |
| Ceiling treatment | High | Moderate–high | £300–£2,000 | Low | Lowered sections over kitchen or dining |
| Glazed screens | Very high | High | £800–£3,000 | Low–medium | Kitchen separation, broken-plan conversion |
Flooring Transitions in Detail
Changing the floor material between zones is one of the most powerful visual signals you can create. In new builds, the developer often provides a transition as standard, but understanding the options lets you make informed upgrade choices.
- Porcelain tiles to engineered oak: The classic combination. Tiles handle the kitchen's moisture and spills; engineered wood brings warmth to the living zone. A brass or matt black threshold strip (£10–£35) creates a clean join.
- LVT throughout with pattern change: Luxury vinyl tile in a stone effect for the kitchen transitioning to a wood-effect LVT in the living area. Same material, different aesthetic. Cost-effective and seamless.
- Polished concrete to carpet: Increasingly popular in contemporary new builds. The concrete anchors the kitchen's utilitarian character; carpet provides the softness and acoustic absorption the living zone needs.
- Large-format tiles to herringbone LVT: The shift in laying pattern alone creates a visual boundary even if both materials are similar in tone.
Where two materials meet at the same level without a threshold strip, the effect is particularly contemporary. This flush transition requires precision from the installer but delivers the cleanest result.
Using Rugs as Zone Anchors
A rug is the most versatile and immediately impactful zoning tool. The rules for getting it right are straightforward.
- Living zone: The rug should be large enough for all front sofa legs to sit on it. A 200cm x 300cm rug is the minimum for a standard three-seater arrangement. Ideally, choose 240cm x 340cm or larger.
- Dining zone: The rug must extend at least 60cm beyond the table edge on all sides so chairs remain on the rug when pulled out. For a 160cm table, that means a rug of at least 280cm x 280cm.
- Material matters: Wool rugs (£250–£800 from John Lewis, Habitat) absorb more sound than synthetic alternatives. Washable rugs from Ruggable (£189–£350) are ideal for family homes.
- Pile depth for acoustics: Choose a pile of at least 15mm with quality felt underlay (£30–£60 for 200x300cm) to maximise sound absorption on hard floors.
Kitchen-Diner-Living Layout Strategies
The spatial relationship between your three zones determines how the room flows day to day. In most new builds, the kitchen occupies the rear wall with the dining zone centrally placed and the living area towards the front or side of the room. Here are the three most common configurations and when each works best.
Linear Layout (Galley-Style Kitchen)
The kitchen runs along one wall, with dining and living arranged sequentially along the room's length. This is common in terraced and mid-terrace new builds where the room is long and relatively narrow (typically 4m–5m wide). The dining table sits centrally, and the sofa faces the opposite end wall.
- Advantage: Clear traffic flow from front to back; natural zone progression.
- Challenge: Can feel corridor-like if not broken up with rugs, pendant lights, and a change in flooring at the dining-to-living transition.
- Key tip: Use a round dining table rather than rectangular to ease circulation in narrower rooms.
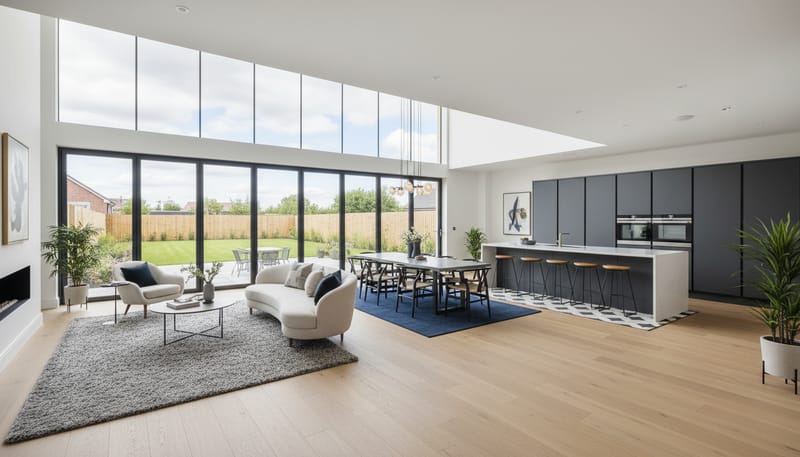
L-Shaped Layout (Kitchen with Island)
The kitchen wraps around a corner with an island projecting into the room. The island doubles as a breakfast bar and creates a natural boundary between cooking and dining zones. This appears in detached and semi-detached homes with wider ground floors (typically 5m–7m wide).
- Advantage: The island is the social hub, perfect for casual meals and supervision of children.
- Challenge: Requires adequate clearance, at least 1,000mm between island and any wall or unit for comfortable movement.
- Key tip: Position bar stools on the living-zone side of the island so seated guests face the room rather than the hob.
Wraparound Layout (U-Shaped or Open Corner)
The kitchen occupies two walls with the dining zone in the centre and the living area wrapping around a corner. This suits larger detached homes and corner plots where dual-aspect glazing floods the space from two directions.
- Advantage: Maximum worktop space; dining and living feel distinctly separate from the kitchen.
- Challenge: Can isolate the cook from the living area. A pass-through opening or lowered worktop section maintains connection.
- Key tip: A peninsula (half-island attached to one wall) provides the social seating of an island without requiring a full island's footprint.
Furniture Arrangement by Room Size
New build open-plan spaces vary enormously, from compact apartments at 25–30 sq m to generous detached layouts of 50–70 sq m. What works in one will overwhelm or underwhelm the other. This table provides specific guidance scaled to your room.
| Room Size | Sofa Configuration | Dining Table | Island/Breakfast Bar | Key Layout Tip |
|---|---|---|---|---|
| Small (25–35 sq m) | Compact 2-seater + armchair; avoid bulky corner sofas | Round 100–120cm (seats 4) | 2–3 stools at a narrow breakfast bar | Use a single large rug to unify rather than multiple small ones which fragment the space |
| Medium (35–45 sq m) | 3-seater sofa + armchair, or small L-shape (230cm max per side) | Rectangular 140–160cm or round 120–140cm (seats 4–6) | 3–4 stools at a standard island overhang | Float the sofa away from the wall with a console table behind it to divide kitchen-dining from living |
| Large (45–55 sq m) | Full corner sofa (280cm+) or sofa + loveseat facing arrangement | Rectangular 180–200cm or round 150cm (seats 6–8) | 4–5 stools at a generous island | Create a reading nook with an armchair, floor lamp, and side table away from the main seating group |
| Extra-large (55–70+ sq m) | U-shaped sectional or two facing sofas with coffee table between | Extending table 200–240cm (seats 8–10) | 5–6 stools at a large island with integrated sink | Use a freestanding bookcase or sideboard mid-room to prevent the space feeling like a hall |
Regardless of size, maintain a minimum 600mm circulation gap behind sofas and around dining chairs when pushed back from the table. In smaller rooms, choose furniture with exposed legs rather than floor-skimming bases, as this creates visual lightness and makes the floor area appear larger.
Acoustic Considerations
Noise is the most common complaint about open-plan living, and it worsens over time as the initial excitement of the layout gives way to the daily reality of competing sounds. Modern new builds with hard floors, plasterboard walls, and large glazed areas reflect sound rather than absorbing it, creating a reverberant environment that amplifies every conversation, clattering pan, and children's television programme.
Understanding the Problem
Sound in an open-plan space behaves differently from a traditional room with doors and carpeted floors. The reverberation time (how long a sound lingers) in an untreated open-plan new build can exceed 0.8 seconds, making speech harder to understand and increasing the perceived volume of background noise. The target for a comfortable living space is 0.4–0.6 seconds.
Acoustic Treatment Options
- Thick wool rugs (15mm+ pile): The most natural and effective first step. A large rug in each zone reduces impact noise and airborne reflection. Budget £250–£800 per rug plus £30–£60 for felt underlay.
- Heavy curtains: Floor-to-ceiling interlined curtains in heavyweight fabric (velvet, thermal-backed linen) absorb significant sound at the glazed rear wall. Ready-made: £200–£600. Made-to-measure: £400–£1,200 from John Lewis, Hillarys, or a local maker.
- Upholstered furniture: Fabric sofas absorb far more sound than leather or faux-leather alternatives. Upholstered dining chairs outperform hard wooden or metal seats acoustically.
- Bookshelves: A well-stocked bookshelf acts as an excellent sound diffuser, breaking up reflected waves rather than bouncing them back cleanly.
- Acoustic wall panels: Slatted timber panels from brands like SlatWall (£40–£80 per sq m) combine sound absorption with a contemporary aesthetic. IKEA ODDLAUG panels (£15 for three) offer a budget entry point.
- Ceiling acoustic panels: Suspended or surface-mounted panels above the dining zone dramatically reduce the clatter of conversation and crockery. From £60–£150 per panel.
- Soft furnishings layers: Cushions, throws, table runners, and upholstered headboards on any visible bedroom furniture all contribute incrementally to sound absorption.
The 60/40 Rule
As a practical target, aim for approximately 60% hard surfaces (floors, walls, windows, worktops) and 40% soft surfaces (rugs, curtains, upholstered furniture, cushions, acoustic panels) in your open-plan space. Most untreated new builds sit at roughly 85/15, which explains the echoey feel. Layering in soft furnishings progressively shifts the ratio towards acoustic comfort.
Heating Open-Plan Spaces
New builds with their high insulation levels and airtight construction are inherently easier to heat than older homes. Nevertheless, an open-plan ground floor of 35–55 sq m presents specific heating considerations that are worth understanding.
- Underfloor heating zones: Many new builds with air-source heat pumps include wet underfloor heating on the ground floor. Ensure the open-plan area is divided into at least two separate zones (kitchen and living) with independent thermostats. The kitchen generates supplementary heat from cooking and appliances, so it typically needs a lower set point (18–20°C) than the living zone (20–22°C).
- Radiator positioning: Standard panel radiators beneath windows can restrict furniture placement. Vertical designer radiators (£200–£600 from Milano, BestHeating, or Trade Radiators) free up wall space and make a design statement. Low-profile models that sit behind furniture are another option.
- Heat pump compatibility: Open-plan layouts work exceptionally well with air-source heat pumps because the lower flow temperatures (35–45°C compared to 60–70°C for gas boilers) distribute heat gradually and evenly through a large volume.
- MVHR contribution: Mechanical ventilation with heat recovery recovers up to 90% of heat from extracted air, maintaining consistent temperatures throughout the open-plan space. Replace filters every 6–12 months (£20–£50 per set) and service the system annually.
- Bi-fold door draughts: Even in new builds, large glazed openings can create cold spots near the rear wall in winter. Heavy curtains or thermal blinds (£150–£400) address this while contributing acoustic benefit. For detailed guidance on energy efficiency, see our guide to maximising your new build's energy efficiency.
Storage in Open-Plan Living
In an open-plan space, everything is on permanent display. The kitchen mess you might tolerate behind a closed door is now visible from the sofa. The children's toys scattered across the living zone are visible from the dining table. Effective storage is not a luxury here; it is the foundation of a liveable open-plan home.
Kitchen Zone Storage
- Full-height larder units: With pull-out racks, these provide more accessible storage per square metre than any other kitchen configuration. Ask your developer about upgrading to larder units during the specification stage.
- Deep pan drawers: Far more efficient than base cabinets with shelves. Everything is visible and accessible without kneeling and reaching.
- Concealed appliance cupboards: Toasters, kettles, and stand mixers stored behind closed doors keep worktops clear and the kitchen looking pristine from every angle.
- Island storage: Many kitchen islands include drawers and cabinets on the dining-zone side. Use these for table linens, serving dishes, and everyday items that bridge kitchen and dining use.
Living Zone Storage
- Media units with doors: The IKEA BESTA system (from £85 per unit) conceals cables, consoles, remotes, and the inevitable clutter behind clean, handleless doors.
- Built-in wall units: A full-wall built-in combining base cabinets, open shelving, and a media recess is one of the best investments in open-plan living. Local carpenters charge £2,000–£6,000 depending on size and materials. The result is architectural, clean, and provides enormous capacity.
- Storage ottomans: Dual-purpose furniture that provides seating and hidden storage. From £150 at John Lewis, MADE.com, or Dunelm.
- Low-level baskets and boxes: Attractive woven or fabric storage baskets in the living zone keep children's toys, blankets, and magazines contained. At the end of the day, everything goes in the basket and the room resets.
Lighting Plan: Ambient, Task, and Accent by Zone
Lighting is the single most transformative element in open-plan living, and the area where new builds are weakest at handover. Most new homes are delivered with a single lighting circuit for the entire ground floor, usually consisting of identical 4000K downlights spaced evenly across the ceiling. This provides adequate illumination but zero atmosphere, zero zone differentiation, and zero ability to change the mood of the space.
A well-designed lighting scheme uses three layers — ambient, task, and accent — controlled independently in each zone. Here is the target specification.
| Zone | Ambient Lighting | Task Lighting | Accent Lighting | Circuit Notes |
|---|---|---|---|---|
| Kitchen | Dimmable LED downlights (3000K warm white), evenly spaced at 1.2m centres | Under-cabinet LED strips (£30–£150); directional downlights above worktops and hob | LED strip above wall units or inside glass-fronted cabinets; plinth lighting below base units | Separate circuit with dimmer; task lighting on its own switch |
| Dining | Pendant light(s) hung 700–800mm above table surface (dimmable, 2700K warm) | None typically needed; the pendant provides sufficient focused light | Wall sconces or picture lights on the nearest wall; candles on the table | Dedicated pendant circuit with dimmer; this is the most atmospheric zone |
| Living | Dimmable downlights at reduced intensity (2700K); or no overhead lights, relying entirely on lamps | Floor lamp beside reading armchair (£40–£200); desk lamp if WFH area exists | LED strip behind the TV (£15–£40); table lamps on console/sideboard; uplighters in corners | Separate circuit; ideally controlled by a smart switch or lamp timer for evening ambience |
Practical Steps to Upgrade Your Lighting
- Add separate circuits: If your open-plan area is on a single circuit, hire an electrician to split it into three zones. Cost: £200–£500. This is the single highest-impact lighting upgrade you can make.
- Install dimmer switches: LED-compatible dimmers (Varilight V-Pro or BG Nexus, £15–£40 each) can be retrofitted in under an hour per switch. Every circuit should dim.
- Replace bulb temperature: Swap any 4000K cool white bulbs for 2700K–3000K warm white. The warmer tone transforms the atmosphere at minimal cost (£2–£5 per bulb).
- Add pendant lighting: Install a pendant above the dining table. Popular options include Tom Dixon Beat (from £250), Original BTC Hector (from £140), and the IKEA SINNERLIG (from £45).
- Layer in plug-in lighting: Table lamps, floor lamps, and LED strips require no electrician and provide the accent layer that makes the space feel layered and considered.
If you are at the reservation stage with your developer, ask about upgrading to separate lighting circuits and pendant points as part of your specification. This is significantly cheaper during construction. See our guide to developer upgrades worth choosing for more detail.
Colour Flow Strategies
In an open-plan space, colour must feel cohesive across all three zones while still allowing subtle differentiation that supports the zoning strategy. The key principle is flow with variation: a shared palette that shifts in emphasis from zone to zone.
- Single base, shifting accents: Paint the entire space in a single neutral (e.g., Farrow & Ball Skimming Stone, Dulux White Mist, or Little Greene Slaked Lime). Then vary accent colours by zone: cool blue-greys in the kitchen, warm terracotta or olive tones in the living area, a bold pendant or artwork at the dining table.
- Warm-to-cool gradient: Use a warmer neutral in the living zone (Farrow & Ball Joa's White) transitioning to a cooler tone in the kitchen (Farrow & Ball Wevet). The shift is subtle enough to feel unified but distinct enough to signal the change in zone character.
- Feature wall at the dining zone: A single wall behind the dining table in a deeper colour (Farrow & Ball Hague Blue, Little Greene Basalt, or Dulux Sapphire Salute) anchors the dining zone visually. This works especially well when combined with a pendant light that draws the eye.
- Consistent metalwork throughout: Choose one metallic finish for the entire space: brushed brass, matt black, or brushed nickel. Apply it to door handles, light fittings, kitchen hardware, curtain poles, and picture frames. This thread of consistency ties diverse zones together.
- Material continuity: If your kitchen has an oak worktop, echo that timber in the dining table or a floating shelf in the living zone. If the kitchen splashback is marble, use the same marble for a coffee-table top. These material links create coherence without uniformity.
The most common mistake is treating each zone as a completely separate room with its own colour scheme. In open-plan living, every zone is visible simultaneously. The palette must read as one story with three chapters, not three different books.
Open-Plan Living with Children and Pets
Open-plan layouts are enormously popular with families precisely because the cook can supervise children while preparing meals. However, the layout demands specific practical considerations that go beyond standard interior design advice.
Child Safety Checklist
- Induction hob: Essential in open-plan family homes. The surface cools rapidly after use, produces no flame, and cannot ignite loose clothing or paper. Most new builds now offer induction as standard or as an affordable upgrade.
- Soft-close drawers and doors: Standard in most new build kitchens. Prevents trapped fingers and reduces the constant slamming noise that reverberates through open-plan spaces.
- Pressure-mounted baby gates: From BabyDan or Lindam (£30–£80), these provide temporary kitchen barriers that can be removed without wall damage when no longer needed.
- Corner protectors: For kitchen islands and sharp-edged coffee tables. Clear silicone options (£5–£10 for a pack) are nearly invisible.
- Anti-tip furniture straps: Secure freestanding bookcases and shelving units used as room dividers. Especially critical if young children might attempt to climb them.
Family-Friendly Material Choices
- Sofa fabric: Choose performance fabrics with stain-resistant treatment. Loaf, Sofa.com, and DFS all offer ranges specifically designed for family homes. Alternatively, removable washable covers (IKEA KIVIK, VIMLE) handle spills and pet hair practically.
- Flooring: LVT is more forgiving than engineered wood for spills and dropped toys. If you have carpet in the living zone, choose a synthetic blend with stain-resist treatment rather than pure wool.
- Rugs: Washable rugs from Ruggable (£189–£350) go directly into the washing machine. For families with young children or pets, these are transformative.
- Dining chairs: Wipeable seats (faux leather, vinyl, or treated fabric) save hours of cleaning over the first five years of family life.
Pet-Friendly Considerations
Position feeding stations in the kitchen zone where hard flooring makes cleaning easy. Built-in feeding stations within the island or a base cabinet (£100–£300) keep bowls out of the traffic flow. Place pet beds in the living zone but away from the main sofa arrangement to maintain the zoning hierarchy. For scratch-prone pets, avoid delicate rug fibres and consider flatweave or indoor/outdoor rugs (£80–£250) that withstand claws.
Cost Breakdown for Zoning Upgrades
One of the challenges of furnishing an open-plan space is that you are styling three rooms simultaneously. This table provides a realistic budget breakdown for UK buyers in 2026, organised from essential zoning foundations to aspirational additions.
| Upgrade Category | Budget Option | Mid-Range | Premium | Priority |
|---|---|---|---|---|
| Separate lighting circuits (3 zones) | £200 | £350 | £500 | Essential |
| Dimmer switches (3) | £45 | £75 | £120 | Essential |
| Living zone rug (200x300cm) | £100 | £300 | £800 | Essential |
| Dining zone rug (240x300cm) | £120 | £350 | £700 | High |
| Dining pendant light | £45 | £150 | £400 | High |
| Under-cabinet LED strips | £30 | £80 | £150 | High |
| Floor lamp (living zone) | £40 | £120 | £300 | High |
| Heavy curtains (rear glazing) | £200 | £500 | £1,200 | High |
| Console table/sideboard (zone divider) | £100 | £300 | £600 | Medium |
| Acoustic wall panels (2–4 panels) | £60 | £200 | £500 | Medium |
| LED strip behind TV | £15 | £30 | £50 | Medium |
| Flooring transition threshold strip | £10 | £20 | £35 | Low (if developer-supplied) |
| Crittall-style glazed screen (broken-plan) | £800 | £1,500 | £3,000 | Optional |
| Built-in storage wall | £2,000 | £4,000 | £6,000 | Optional |
Budget Tiers Summary
- Essentials only (£500–£1,000): Separate circuits, dimmers, one quality rug, one pendant light, and basic curtains. This addresses the biggest pain points and delivers the highest impact per pound spent.
- Well-zoned (£1,500–£3,500): Everything above plus a second rug, floor lamp, under-cabinet LEDs, acoustic panels, console table, and layered accessories.
- Fully styled (£4,000–£8,000): Comprehensive lighting, premium rugs, quality curtains, built-in storage or glazed screen, and curated accessories across all three zones.
- Premium specification (£8,000–£15,000+): All of the above with designer lighting, bespoke built-in joinery, Crittall screen, and premium furniture throughout.
2026 Open-Plan Trends
The way British households use open-plan spaces continues to evolve. These are the key trends shaping design choices in 2026.
- The rise of broken-plan: Partial glazed screens, sliding pocket doors, and half-height walls are increasingly popular as buyers seek the light and space of open-plan with improved noise control and privacy. Developers are beginning to offer broken-plan options in higher-specification homes.
- Integrated home working zones: A dedicated workspace nook within the open-plan area, defined by a wall-mounted desk, task lamp, and subtle colour differentiation, has become a fourth zone in many homes. Compact floating desks (£100–£300) fold flat when not in use.
- Warm minimalism: The trend away from cold, all-white kitchens continues. Warm neutrals, natural timber tones, fluted and reeded textures, and organic shapes dominate, creating open-plan spaces that feel welcoming rather than clinical.
- Smart lighting as standard: Philips Hue, WiZ, and IKEA DIRIGERA ecosystems allow per-zone colour temperature and brightness scheduling without rewiring. Voice and app control mean the lighting scheme adapts automatically to time of day and activity.
- Japandi influence: The fusion of Japanese simplicity with Scandinavian warmth, combining low-profile furniture, natural materials, intentional negative space, and muted earthy palettes, continues to influence open-plan styling.
- Acoustic design as a priority: Slatted timber panels, acoustic art prints, and sound-absorbing ceiling features are no longer afterthoughts. Homeowners and designers are treating acoustics with the same seriousness as lighting.
- Visible kitchen storage: Open shelving, glass-fronted wall units, and curated display are replacing fully closed kitchens. When the kitchen is permanently visible from the living area, it becomes a display piece rather than a utility room.
- Biophilic integration: Indoor plants, living walls, natural stone, and timber elements that connect the interior with the garden visible through rear glazing. This is especially effective in open-plan spaces where bi-fold doors blur the boundary between inside and out.
Common Mistakes to Avoid
After covering every aspect of open-plan design, here is a summary of the errors that most frequently undermine the potential of these spaces.
- Treating the entire area as one room: Without zoning, a large space feels vast but neither cosy nor functional. Use at least three zoning techniques simultaneously: flooring, lighting, and furniture placement at a minimum.
- Pushing all furniture against walls: This creates a dead centre and wastes the opportunity to use sofas, bookcases, and sideboards as room dividers. Pull furniture into the room.
- Single lighting circuit with uniform fittings: This eliminates atmospheric control entirely. Separate circuits with dimmers for each zone are the single most important upgrade.
- Ignoring acoustics until it is too late: Layer in soft furnishings, rugs, and curtains from day one rather than after months of living with echo and noise.
- Undersized rugs: A rug that is too small looks lost and fails to anchor its zone. Measure carefully and err on the side of too large rather than too small.
- Choosing form over daily function: A beautiful but uncomfortable sofa, backless bar stools for a family with young children, a glass coffee table with toddlers: always prioritise how the space is used every single day.
- Mismatched finishes across zones: Choose one metalwork finish, one consistent timber tone, and one cohesive colour palette. Zones should be different chapters of the same story.
- Neglecting the entrance view: In many new builds, the front door opens directly into or towards the open-plan space. Ensure the first thing visible is an attractive focal point, not the kitchen sink or the back of the television.
- Underestimating cooking smells: In open-plan living, ducted extraction is strongly recommended. If you have recirculating only, replace charcoal filters every 3–4 months (£20–£40 per set) religiously.
- Buying everything at once: Live in the space for several weeks before making major furniture purchases. Real daily use reveals patterns that no floor plan can predict.
Managing Cooking Smells: Extraction Options
Cooking odours drifting from the kitchen zone into the living area are one of the most frequently cited frustrations of open-plan living. The solution is effective extraction, and the type you choose significantly affects both performance and the visual character of your kitchen.
| Extractor Type | Cost Range | Odour Removal | Visual Impact | Best For |
|---|---|---|---|---|
| Chimney/canopy hood (ducted) | £200–£800 | Excellent | Prominent; a design feature or a visual distraction | Wall-mounted hobs; budget-conscious buyers |
| Downdraft extractor | £800–£2,500 | Very good | Minimal; rises from behind hob when in use | Islands where overhead hoods would block sightlines |
| Ceiling-mounted extractor | £1,000–£3,000 | Good–very good | Nearly invisible; flush with ceiling | Design-led kitchens where aesthetics are paramount |
| Recirculating hood | £150–£500 | Moderate (filters, not vents) | Same as chimney/canopy | Where ducting to external wall is impractical |
The clear recommendation for open-plan living is ducted extraction. It vents air directly outside, removing odours, moisture, and grease far more effectively than recirculating systems. Retrofitting ducting typically costs £300–£600 including ductwork and external vent. If your new build is delivered with recirculating only, upgrading to ducted is one of the smartest early investments you can make.
Final Thoughts
Open-plan living in a new build is a genuine privilege: a modern, well-insulated, light-filled space with excellent bones and a layout designed for contemporary life. The challenge is not the space itself but how you inhabit it. With thoughtful zoning, layered lighting, considered furniture placement, and attention to the practical realities of noise, smells, and storage, an open-plan new build becomes a space that genuinely enhances your daily life.
Start with the fundamentals: separate lighting circuits, a quality extractor, and well-scaled rugs to anchor your zones. Then layer in furniture, accessories, and personal touches over time. Live in the space for a few weeks before committing to major purchases; your household's real patterns of movement, activity, and rest will become apparent quickly, and that lived experience is more valuable than any Pinterest mood board.
The best open-plan spaces are not designed in a single weekend. They evolve, adapt, and improve as you learn what works for your life. For further guidance on making the most of your new build interior, explore our new build kitchen design guide, our advice on developer upgrades worth choosing, and our tips on maximising energy efficiency in your new home.