Managing the Drying Out Period in Your New Build Home
Every new build home contains a remarkable amount of water. During construction, the bricks, mortar, concrete, plaster, screed, and even the timber framing absorb and retain moisture as part of the building process. Estimates suggest that a typical three-bedroom new build home contains between 3,000 and 5,000 litres of trapped water at the point of completion. This water must gradually evaporate and escape over a period known as the ‘drying out period’ — a process that typically takes 9 to 12 months but can extend to 18 months or longer depending on the season you move in, the construction methods used, and how you manage your home environment.
Understanding and managing this drying out period is one of the most important things you can do as a new build homeowner. Poor management can lead to persistent condensation, mould growth, damaged decorations, warped timber, and an uncomfortable living environment. Conversely, with the right knowledge and a few targeted investments, you can guide your home through this process smoothly, maintaining a healthy, comfortable home while protecting your finishes and your NHBC warranty.
Why New Builds Contain So Much Water
To understand the drying out process, it helps to know where all this water comes from. Every stage of construction introduces moisture into the building:
Foundations and Ground Floor
The concrete foundations and ground floor slab are poured wet and contain enormous amounts of water. A standard concrete slab can take 12 months or more to dry to equilibrium moisture content. The floor screed (the smooth layer on top of the slab) adds further moisture. Even with modern quick-drying screeds, the floor can retain moisture for 3–6 months after completion.
Walls and Brickwork
Bricks are laid using wet mortar, and the bricks themselves absorb moisture during construction, particularly if they were stored outside on site and rained on. The internal blockwork walls are similarly laid with mortar. Internal plaster (typically two-coat plasterwork) is applied wet and can contain 20+ litres of water per room. Each coat needs time to dry, and in practice, builders often apply the finishing coat before the base coat is fully dry.
Timber Frame Homes
Timber frame new builds are increasingly common in the UK, particularly from developers like Stewart Milne and some Taylor Wimpey sites. While the timber frame itself contains less water than masonry, the plasterboard, external render, and floor screeds still introduce significant moisture. Timber frame homes may also be more susceptible to moisture damage if the drying-out period is not managed well, as excess humidity can cause timber to swell and distort.
Painting and Finishing
The initial coats of emulsion paint applied by the developer add further moisture. Windows may be painted while the sills are still drying. Kitchen and bathroom tiling adds wet adhesive and grout. Even the final professional clean before handover introduces water through steam cleaning of hard floors and surfaces. All of this accumulates to create a significant moisture load that the building must shed over time.
Signs Your Home Is Drying Out
During the drying out period, you will notice various symptoms as moisture leaves the building fabric and enters the indoor air. These are entirely normal but can be alarming if you are not expecting them. Here are the most common signs:
Ventilation: The Single Most Important Factor
Ventilation is the cornerstone of managing the drying-out period. Moisture that evaporates from the building fabric enters the indoor air. If this moisture-laden air is not removed from the home and replaced with drier outdoor air, humidity levels will rise, condensation will form, and mould will develop. The equation is simple: moisture evaporates from the structure into the air, and ventilation removes the moist air and replaces it with drier air from outside.
Trickle Vents
Every window in a new build should have trickle vents — the small, adjustable vents built into the window frame. These provide continuous background ventilation that allows moist air to escape and fresh air to enter without significantly affecting the temperature of the room. Keep trickle vents open at all times during the drying-out period, including in winter. Many new homeowners close them to reduce draughts or save energy, but this is counterproductive — the energy cost of running trickle vents is minimal compared with the cost of repairing mould and damp damage caused by poor ventilation.
Extractor Fans
Always use the extractor fan when cooking or bathing, and leave it running for at least 20–30 minutes afterwards to clear the moisture-laden air. New build extractor fans are typically fitted with humidity sensors or overrun timers that keep them running after the light is switched off — do not disable these features. If your extractor fan does not have a timer, consider upgrading to one that does. A basic timed extractor fan costs £20–£40 from Screwfix and can be fitted in an hour by a competent DIYer (or £60–£100 by an electrician).
When cooking, always use the cooker hood extractor and, if possible, open a window slightly to provide replacement air. The goal is to create a cross-flow of air that carries moisture out of the house. When bathing or showering, close the bathroom door to contain the steam and let the extractor fan remove it, rather than allowing the humid air to spread through the rest of the house.
Window Ventilation
During the drying-out period, try to open windows for at least 15–30 minutes each day, even in winter. Opening windows on opposite sides of the house creates through-ventilation that rapidly exchanges indoor air. This is the most effective way to quickly reduce indoor humidity. Yes, it will temporarily cool the house, but the heating system will quickly restore the temperature, and the energy cost is far less than the cost of dealing with mould and damp problems. If security is a concern (particularly on ground floor windows), many new build windows have a locked ‘night vent’ position that provides ventilation while maintaining a degree of security.
✓ Run extractor fans during and after cooking/bathing
✓ Open windows for 15–30 minutes daily, even in winter
✓ Keep internal doors open when possible for air circulation
✓ Leave a 50–100mm gap between furniture and external walls
✗ Do not dry clothes on radiators without ventilating the room
✗ Do not block or close trickle vents to save energy
✗ Do not overheat the house — moderate, consistent warmth is better
Heating Strategy During the Drying Out Period
There is a common misconception that turning the heating up high will speed up the drying-out process. While warmth does increase the rate of evaporation from surfaces, it also increases the moisture-carrying capacity of the air. If this warm, moisture-laden air is not ventilated away, it will simply condense on cold surfaces when the heating goes off — making the problem worse, not better.
The optimal heating strategy during the drying-out period is to maintain a moderate, consistent temperature rather than switching between extremes. Aim for 18–20°C during occupied hours and no lower than 15°C during unoccupied hours or at night. This consistent gentle warmth encourages steady evaporation from the building fabric while minimising the dramatic temperature swings that cause the worst condensation. Avoid the temptation to ‘blast’ the heating to dry out a particularly damp room — this creates a surge of moisture into the air that the ventilation system cannot handle.
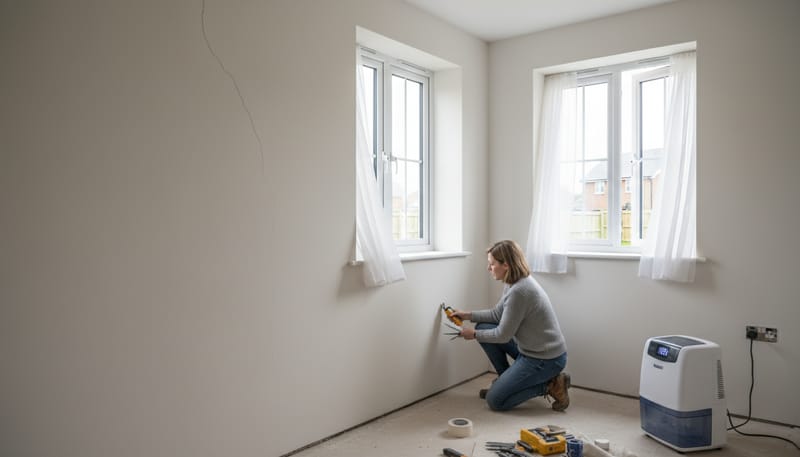
Dehumidifiers: Your Most Valuable Tool
A dehumidifier is arguably the single most useful purchase you can make during the drying-out period. While ventilation removes moist air from the house, a dehumidifier actively extracts moisture from the indoor air, reducing humidity levels even when ventilation opportunities are limited (for example, during cold, wet weather when opening windows is impractical).
Types of Dehumidifier
There are two main types of dehumidifier available in the UK:
Compressor (Refrigerant) Dehumidifiers
These work by drawing air over a cold coil, which causes the moisture to condense and drip into a tank. They are the most common and affordable type. They work best at temperatures above 15°C and in rooms with humidity above 50%. They are noisier than desiccant models and less effective in cold rooms.
Price range: £120–£300
Running cost: 3–6p per hour
Desiccant Dehumidifiers
These use an absorbent desiccant wheel to draw moisture from the air. They work effectively at lower temperatures (even in unheated rooms) and lower humidity levels. They are quieter and lighter than compressor models but use more electricity and give off gentle warmth. They are the better choice for a new build drying-out period because they work in all conditions.
Price range: £150–£350
Running cost: 5–8p per hour
Recommended Dehumidifiers for New Build Homes
How to Use a Dehumidifier Effectively
To get the best results from your dehumidifier during the drying-out period, follow these guidelines:
Place the dehumidifier in the room where humidity is highest (usually the living room or the room most affected by condensation). Close the doors to that room to create a contained environment. Set the dehumidifier to its target humidity setting (usually 50–55% relative humidity) or run it continuously on a low setting. Move the dehumidifier to different rooms throughout the day or over several days to give each room the benefit. Many people start in the living room during the day and move the unit to the bedroom at night.
You will be astonished at how much water a dehumidifier extracts from a new build, particularly in the first few months. It is not unusual to empty the tank (typically 3–6 litres) once or even twice a day during the early stages of drying out. As the building dries, the rate of extraction will gradually decrease. If your dehumidifier has a continuous drainage option (most do), you can attach a hose and drain it directly into a sink or bucket, eliminating the need to empty the tank manually.
Monitoring Humidity Levels
A digital hygrometer is an essential and inexpensive tool for monitoring the drying-out progress. Costing just £8–£15 from Amazon or Screwfix, a hygrometer displays the current temperature and relative humidity in the room, often with a memory function that records the minimum and maximum readings over 24 hours.
Place hygrometers in the rooms most likely to have high humidity — the main bedroom, living room, and bathroom. Check readings at different times of day and note the patterns. Humidity typically peaks first thing in the morning (after overnight breathing and the house cooling down) and after cooking or bathing.
Managing Condensation on Windows
Window condensation is the most visible symptom of the drying-out period and often the most frustrating for new homeowners. Waking up to windows streaming with water is not pleasant, and if left unaddressed, the standing water can damage window sills, encourage mould on window frames, and stain curtains or blinds.
The most effective daily routine is to wipe all windows and sills first thing each morning, then open windows for 15–20 minutes to flush out the overnight humidity. Use a window vacuum (the Kärcher WV1 at £40–£50 or WV6 at £75–£100 are excellent options) for a quick, efficient clean that takes just 5 minutes for the whole house. Window vacuums suck up the condensation water rather than just smearing it around, and the collected water can be emptied down the sink.
For bedrooms, which tend to have the worst condensation (from overnight breathing), keep the bedroom door closed at night and ensure the trickle vent is open. If possible, leave the bedroom window on the night vent position. A dehumidifier running in the bedroom overnight will dramatically reduce morning condensation. If condensation appears between the panes of a double-glazed unit (rather than on the inside surface of the inner pane), this indicates a failed sealed unit and is a defect that should be reported to the developer — it is not related to the drying-out period.
Dealing with Mould
Despite your best efforts with ventilation and dehumidification, some mould growth is almost inevitable during the drying-out period, particularly in corners, behind furniture, and in enclosed spaces. The key is to deal with it promptly and address the underlying cause (excess humidity and poor air circulation) rather than just treating the symptoms.
Cleaning and Preventing Mould
To clean existing mould, use a purpose-made mould remover rather than bleach (which kills surface mould but does not prevent regrowth). HG Mould Spray (£5–£8 from most supermarkets and DIY shops) or Dettol Anti-Mould spray (£3–£5) are effective options that kill the mould spores and leave a residual protective film. Spray the affected area, leave for the recommended time, and wipe clean. For persistent mould on silicone sealant (particularly around baths and showers), it is often more effective to remove and replace the sealant entirely using anti-mould silicone.
To prevent mould from returning, address the air circulation in the affected area. Pull furniture at least 50–100mm away from external walls to allow air to flow behind it. In wardrobes on external walls, use moisture absorbers such as Kilrock Damp Clear sachets (£3–£5 from Lakeland) or refillable dehumidifier boxes like the UniBond Aero 360 (£8–£15). Ensure the wardrobe doors are left slightly ajar when not in use to promote air circulation inside.
Settlement Cracks: When and How to Repair
Settlement and shrinkage cracks are an inevitable consequence of a new building drying out and settling under its own weight. They are cosmetic, not structural, but they can be unsightly. The most important advice is patience — do not rush to fill or paint over cracks too early.
Timeline for Crack Repair
Recommended Products for Crack Repair
Paint and Decoration During the Drying Out Period
One of the most common questions from new build owners is when they can redecorate. The developer’s initial coat of paint is typically a basic trade emulsion applied quickly over freshly dried plaster. It is not intended to be the final decorative finish — it is a holding coat that allows the plaster to continue drying through it while providing a presentable appearance.
The general advice is to wait at least 12 months before undertaking any serious redecoration, particularly on external walls and in rooms where condensation has been prevalent. Painting too early risks trapping moisture behind a non-breathable paint layer, which can cause blistering, peeling, and even damp problems. If you must decorate earlier (for example, a nursery for a new baby), use a breathable emulsion paint and accept that you may need to repaint again in 12–18 months after the building has fully dried.
Safe During Drying Out
- ✓ Touch-up paint on marks and scuffs
- ✓ Breathable emulsion on internal walls
- ✓ Feature wall with breathable paint
- ✓ Painting internal partition walls
Avoid Until Fully Dry (12+ months)
- ✗ Wallpaper on external walls
- ✗ Vinyl or non-breathable paint on damp walls
- ✗ Full redecoration of all rooms
- ✗ Fitting wardrobes flush against external walls
Reducing Indoor Moisture Generation
During the drying-out period, it is important to minimise the additional moisture you add to the indoor air through daily activities. The building is already releasing thousands of litres of moisture — you do not want to add more than necessary.
The single biggest source of indoor moisture (apart from the building itself) is drying clothes indoors. A single load of wet washing releases approximately 5 litres of water into the air as it dries. During the drying-out period, avoid drying clothes on radiators or indoor airers wherever possible. If you must dry clothes indoors, do so in a well-ventilated room with the door closed and the window open, or use a vented tumble dryer that exhausts to the outside. A condenser tumble dryer is less ideal as it releases some moisture into the room, but it is still better than hanging wet clothes on radiators. A heat pump tumble dryer (such as the Samsung DV90T6240LH at £550–£650 or the Bosch WTH85223GB at £500–£580) offers the most energy-efficient indoor drying option.
When cooking, always use pan lids to contain steam, use the extractor fan or cooker hood, and open a window if possible. When running a bath or shower, close the bathroom door, open the window slightly, and run the extractor fan during and for at least 20 minutes after. These habits will become second nature and make a significant difference to indoor humidity levels.
Drying Out Period Cost Summary
Managing the drying-out period does involve some expense, but these investments protect your home and your decorations from far more costly damage. Here is a realistic budget summary:
Frequently Asked Questions
Final Thoughts
The drying-out period is a temporary phase that every new build home goes through. With the right knowledge and a modest investment in a dehumidifier, hygrometers, and good ventilation habits, you can manage this process effectively and protect both your health and your home. The key messages are simple: ventilate generously, heat moderately and consistently, use a dehumidifier, monitor humidity levels, and be patient with cosmetic issues like cracks and paint blemishes — these will all be resolved when you redecorate after the building has fully dried out.
Remember that the drying-out period is not a sign of poor construction — it is a natural consequence of building with wet materials. Every new build in the UK goes through this process, regardless of the developer or the price bracket. Your developer should have provided information about drying out at handover, and the NHBC publishes helpful guidance for homeowners. By taking an active, informed approach to managing moisture in your new home, you will emerge from the drying-out period with a comfortable, healthy, and beautifully dry home that is ready for its final decorative touches.
For more practical guidance on caring for your new build home, explore our guides to seasonal maintenance, storage solutions and organisation, and insurance for your new build home.